

How To Save Current Revit Project As A Template
13 Tips To Create A Keen Revit Template
Creating a great template in Revit is challenging. Where practise yous even start? With years or refinement and experimentations, nosotros found the best standards and features to use.
If you like this guide, brand sure to check out our brand new Revit Pure Nuts template , which includes all the tips below and much more.
![]()
1- START WITH THE REVIT OOTB TEMPLATE
When creating your template, you lot have the option to get-go from scratch or to use the Revit out-of-the-box template as a starting point. Starting from scratch is way too much piece of work for no reason, and then your best bet is to use the Default Revit template. Architectural template is probably your best choice, although the Construction template has a few interesting pre-made schedules for quantities.

A third option is to buy a quality template from a 3rd party source. Whatever option you choose, you'll have some work to practise to adapt the template to your office standards.
ii- USE A CUSTOM PREFIX FOR ALL ELEMENTS
The first pace is to rename all default elements with a prefix specific to your business. Why go through this long process? When you are done, it will be much more than elementary to distinguish your standards elements from the foreign elements. Every fourth dimension a user download a random family unit from the cyberspace, it will exist obvious since the name will exist different. That volition requite you more control over what is going on inside your projects.
In the case below, nosotros use the RP prefix for all elements. That makes information technology obvious when an "alien" element is added to the model.

You should apply this trick not only to the loadable families merely also the system families (walls, roofs, dimensions, lines, regions, materials, etc).
3- USE ABBREVIATION FOR SPECIFIC ELEMENTS
In addition to using a custom office prefix for all elements, you should too institute an abbreviation arrangement for elements in a certain category. For instance, consider naming all roofs using R1, R2, R3... Another trick might be to utilize prefix DT for detail item families, prefix DOOR for all doors families. At that place is ii benefits from such a technique: it keeps your model organized and information technology allows you to easily spot foreign families and elements.

4- Adjust LINES THICKNESS
Go to the Manage tab. Then, click Additional Settings and selection Line Weight.
Past default, the thickness of the lines is different depending on the scale. For example, line 1 will be 0.10mm in a 1:100 scale view, but 0.18mm in a 1:50 scale view.

While some users might like this feature, simplicity is always better. Y'all should go far so the line thickness is always the same regardless of the scale. Likewise, you lot should beef up the thickness a little flake. The default lines are probably a little too thin. Below is the line weight we recommend. That's what is used in the RP template.

v- CREATE CUSTOM LINES
The default lines provided in the Revit template (Calorie-free, Medium and Heavy) are not sufficient. There needs to be more of them.
The lines should be organized in a better way. Here is an instance from the Revit Pure template below:

We use the thickness number as well as the thickness itself in the line proper name. Information technology is much more explicit than "medium line".
You lot should also create many other lines that you will utilize in most of your projects. Utilize a clear way to proper name the line. For instance, in the instance below we use the role prefix, then the thickness number, then a short description. A medium sized red dashed line will be called: RP-3-Ruby-red-Dash.

half-dozen- Set A STARTING VIEW, CREATE A WELCOME PAGE
By default, opening a Revit model will transport you to the terminal opened view earlier y'all last airtight the file. This is bad considering information technology might affect the performance of your model, especially if a 3D view is opened. To avoid this issue, set a Starting View in your template. Each time you open a Revit file created from this projection, you will country on the aforementioned page.
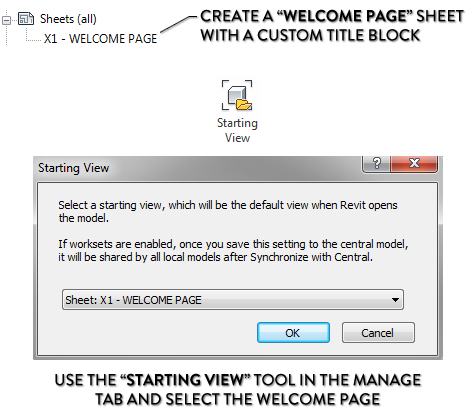
Yous should create a Title Block named "Welcome Folio" containing information well-nigh the project, like projection number and accost. This championship block should besides accept a space where the BIM or project manager can leave some data to other users. For case, you lot tin write friendly messages like "get rid of the warnings, dummy" or "terminate deleting the grids". These nice bulletin volition be seen every fourth dimension someone opens the project.

vii- NUMBER YOUR VIEWS
Your project browser can become chaotic actually quickly. Yous demand to come with a organisation to properly proper name your views so you and your colleagues don't get confused. The first step is to utilize a number at the beginning of each view. This manner, they will always remain in the club they were created. Unwanted views with weird names volition be spotted quickly if the method is enforced. To have a proper noun in the Title Block, apply the "Title On Sail" parameter.

8- DON'T INCLUDE EVERYTHING IN THE TEMPLATE
Don't include all the famillies and every single particular yous've ever created in the template. You lot demand to keep your template lean. Hither is a rule of thumb: if you are using an element less than fifty% of the time, don't include it. Place information technology in another container file. These "container files" can include all the families, detail items, drafting views, title blocks, etc.
9- CREATE A "TEMPLATE STANDARDS" Fable VIEW
Create a fable views containing all lines, regions, tags, dimensions manner and all graphic symbols. This makes it piece of cake for users to understand how the template is working. Here is an example:


x- Add Ruby TEXT NOTES TO EXPLAIN THE TEMPLATE
Some tools within your template might exist difficult for beginners to understand. The solution is to add a few red text notes that the users can delete when the projection is far plenty along.
In the case beneath, nosotros add some red text notes to explain how to utilise the door schedule.

11- IDENTIFY THE Projection INTERNAL ORIGIN
If you are going to share the Revit file or export information technology to CAD, you should spot the location of the Project Internal Origin.
Warning: the Project Internal Origin is not the same as the Projection Base Point. The Projection Base Bespeak is represented by a blue symbol and tin exist moved around. The Project Internal Origin is a fixed point that can never be moved, always. By default, a CAD export will set the 0,0,0 origin at this Project Internal Origin.We wrote a full web log post on this topic.
For these reasons, it is helpful to know where this origin indicate is located when starting a project. Create grids at the intersection of the origin and create a note indicating this information.

12- METRIC VS Purple: Ane OR TWO TEMPLATES?
There is a widespread debate well-nigh whether your should have 2 carve up templates for each units system. At Revit Pure, we retrieve you should have a unmarried template. The problem is that each time yous want to modify your template, you will have to update both of them. That makes it more likely there will be problematic differences between the ii versions of the template.
The best style to go is to have the template fix in the unit you will exist using almost of the time. Then, duplicate some of the families that are using specific dimensions. Ordinarily, that ways doors, windows and profiles.
If you are creating an imperial project using your metric template, simply modify the units when creating the project and supersede the metric families for doors, windows and profiles with the majestic ones.
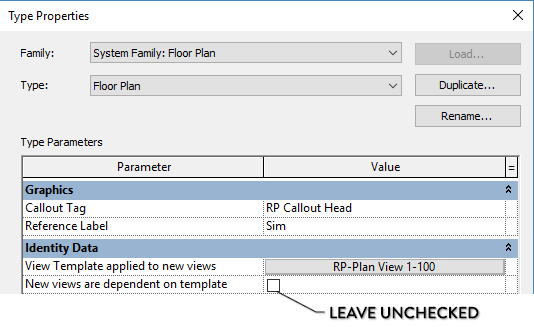
13- USE INDEPENDENT VIEW TEMPLATES
If you are a beginner working on small projects, it is probably non necessary to use view templates. However, the moment y'all get more experience, they become actually useful and tin salve you a lot of fourth dimension.
At the minimum, you should gear up a View Template while leaving the parameter "New views are dependent on template" unchecked. That way, all the required settings are applied when creating a new view, but beginners won't become dislocated by the strict utilise of the view templates.
Once you beginning to get really comfortable with Revit, consider having dependent view templates for all view types.
SAVE 100 HOURS WITH OUR BASICS TEMPLATE
If y'all want to kickoff from scratch and build your own template using the tips above, you have 100 hours of boring, mundane piece of work in front of y'all. Instead of wasting your precious time, become our popular Revit Pure Nuts template , which includes all the tips in this guide and much more. The features in this Template have been created with years of experimentation and iterative refinement. Want to know what is inside? Download the Template guide.


How To Save Current Revit Project As A Template,
Source: https://revitpure.com/blog/13-tips-to-create-a-great-revit-template
Posted by: caponecestion.blogspot.com
0 Response to "How To Save Current Revit Project As A Template"
Post a Comment